LAB 03-01 - OTA Firmware Update
Goals
In this lab we are going to do an Over the Air Upgrade of the Firmware from AWS platform
You will leverage the aws freertos provided OTA agent demo. This is the standard demo that comes with the FreeRTOS release package. There is no �user-application� code in this demo.
We will run the standard aws OTA demo app and observe the version number being changed in the new firmware. Focus is purely on the process and not on the application itself
OTA Job Processing Flow
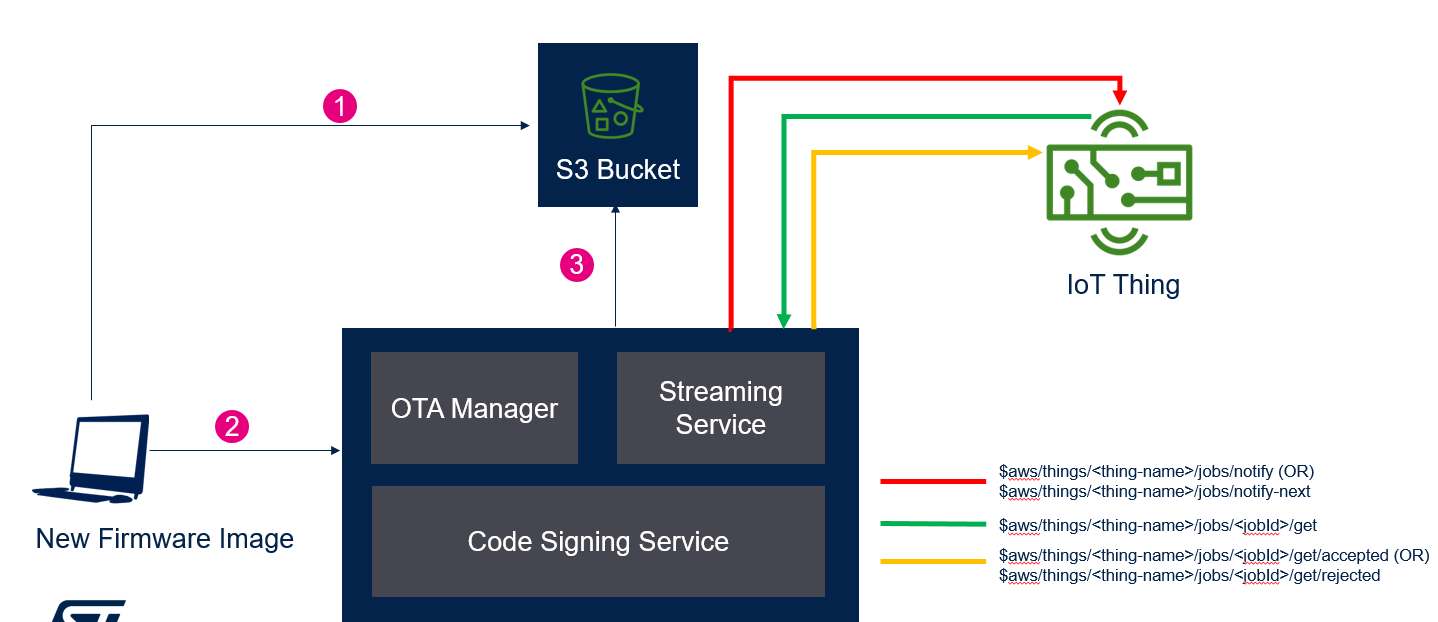
OTA Steps
The existing application firmware image shall be swapped to the newer version
- Bootloader + Application Image –> Initial Version
- Application Image (NEW) –> Device will be updated with this version via OTA (.sfb)
The 2 Application Images are differentiated by the Firmware Version number. It can be functional differences as well in the actual use-case. In the demo, we are not adding any user code, to the standard FreeRTOS standard demos.
Bootloader + Application Image
Application Image (NEW)
Firmware Image Preparation 1
1.Create a code signing certificate and profile on the AWS console (once for all).
2.More details about this can be found in https://docs.aws.amazon.com/freertos/latest/userguide/ota-code-sign-cert-win.html
3.Two files, ecdsasigner.key and ecdsasigner.crt, will be generated in the above step. Keep them.
4.Open ecdsasigner.crt, and copy the content to the pcClientCertificatePem[] static array in the OTA PAL (\Projects\B-L4S5I-IOT01A\Applications\Cloud\aws_demos\Src\ports\aws_ota_pal.c).
Note: remember to include the �\n� to every line in the certificate.
Sample pcClientCertificatePem
static const char pcClientCertificatePem[] =
"-----BEGIN CERTIFICATE-----\n"
"MIIBZzCCAQ6gAwIBAgIUPAaZYTn8oEo2nSwhp1Mw6+V9rEwwCgYIKoZIzj0EAwIw\n"
"ITEfMB0GA1UEAwwWdGVzdF9zaWduZXJAYW1hem9uLmNvbTAeFw0yMDA3MjcwNjMx\n"
"MjFaFw0yMTA3MjcwNjMxMjFaMCExHzAdBgNVBAMMFnRlc3Rfc2lnbmVyQGFtYXpv\n"
"bi5jb20wWTATBgcqhkjOPQIBBggqhkjOPQMBBwNCAAQm90RMUQXgSJCRl57a7dGJ\n"
"NANo0VI5DKhArRMZpnz9IbAfF2MOsXounabuy3ub9+oa0/ga0LWsbGR6IMgUAjef\n"
"oyQwIjALBgNVHQ8EBAMCB4AwEwYDVR0lBAwwCgYIKwYBBQUHAwMwCgYIKoZIzj0E\n"
"AwIDRwAwRAIgEAeBB9Ica7Hq5h4f8Rs/9kFb3mIwRNoHsTr/Chs/8KECIGOAu3oz\n"
"0EA4wzS7ZQDN2QijGqX9ml4tLp1V7VZux658\n"
"-----END CERTIFICATE-----\n";
*** Common error is to forget the \n in the certificate file
Firmware Image Preparation 2
replace CONFIG_MQTT_DEMO_ENABLED by CONFIG_OTA_UPDATE_DEMO_ENABLED
ST custom demo must be disabled in the firmware in main.h file located in aws_demos/Inc directory. Please make sure that CONFIG_ST_CUSTOM_DEMO_ENABLED is commented (// beginning of the line)

Firmware Image Preparation 3
1.Build the first version of the Image and flash the unified bin (PostBuild/SBSFU_B-L4S5I-IOT01_aws_demos.bin) to the target
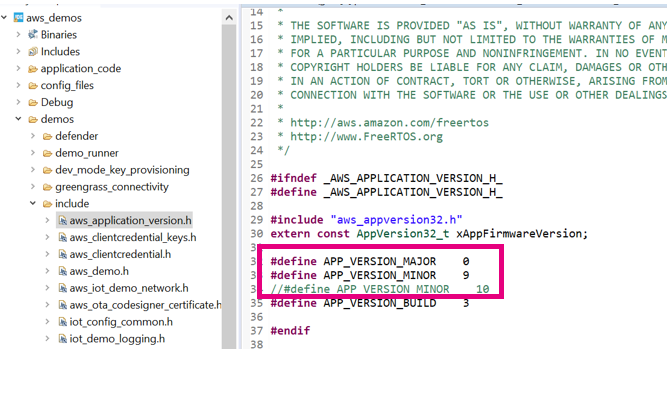
2.Increment the firmware version number in the file demos\include\aws_application_version.h
For example, modify APP_VERSION_MINOR from 9 to 10
this is mandatory, otherwise the update will be rejected by the self-test
- Rebuild the project and generate the .sfb file using the steps described above. The file can be found in APPLICATION_BASEDIR/STM32CubeIDE/PostBuild/. Do not flash it to the board
Initial Image Output, prior to the firmware upgrade
We will use the version number to distinguish between the Old/New Version
The initial image output will show the demo version is the old one, like 0.9.2
